
Tick Tok the clock is ticking and the deadline for the first demo of the app that Ayman and I were working on for the past month is coming very quickly, but we almost got there.
Last week I continued working on taking a picture using image cropping library and upload it to the server. Sending files -including images- to the server is done using Multipart POST request, not a normal POST request, there are more lines of codes needed to be written to handle the Multipart request and Retrofit made it very easy to do that. Future Studio channel on Youtube and their website have a good tutorial on How to Upload Files to the Server, and they also have very good tutorials on Retrofit and related topics.
Also, I worked on the UI for the app. Hind sent me the app design and my mission was to apply that design on the app, which was very amusing to see the user interface turning from ugly and unpleasant for the eye to a simple and nice user interface, with nice colors and views positioning that the user can act with them with ease. I did a basic design while I was working on the app but this design was way better than mine, which reminds me to work on my designing skills.
I also worked with the creation of the views programmatically at the code depending on the data coming from the server. Let’s take an example to demonstrate why I needed to create views in the code and not simply put them it in the XML as usual. If the app has EditText views but the numbers of EditText views will be defined by the data coming from the server. So -as far as I know- you can’t do that in XML because you don’t know how much EditText you gonna need to create, so you will need to create those EditText views in the code when these data arrive from the server.
There is the normal way of creating views in the code, or you can simply do like I did, I create these views in code Anko Layout style.
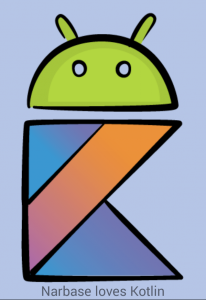
This week’s post will be another tutorial, and it will be on how to use Anko Layout. In this tutorial we will create a very simple app that doesn’t do anything interesting, it will just show an image with a text in front of it, so that’s mean we will use a Relative Layout. It will look something like the following:
We will create this without writing a single line of XML and we don’t even need the activity_main.xml file.
Like the previous tutorial, all codes for this tutorial were written using Kotlin, I am using Android Studio 3.0.1. Now create a new project in Android Studio and name it Anko Layout ,and make sure to check to include kotlin support and choose an empty activity.
As always, you have to add the dependency for the Anko Layout in gradle, as follows: (Add in build.gradle(Module:app) file)
    implementation "org.jetbrains.anko:anko-sdk25:$anko_version" // sdk15, sdk19, sdk21, sdk23 are also available
    implementation "org.jetbrains.anko:anko-appcompat-v7:$anko_version"
In build.gradle(Project:AnkoLayout), add the anko version, in the time of writing this tutorial the anko version was:
ext.anko_version = '0.10.7'
Now is time to sync your project.
The Project Structure
The project structure will be as follows:
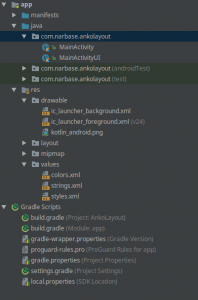
As we can see we don’t have any XML file.
We can create all the layouts in the MainActivity but it’s a good practice to separate the UI classes from Activity classes, and here in Narbase we always apply good practices. So I created a new class named MainActivityUI.kt.
Code
In res/values/strings.xml add this line:
<string name="narbase_loves_kotlin">Narbase loves Kotlin</string>
In MainAactivityUI.kt class the code as follows:
package com.narbase.ankolayout

import android.widget.ImageView
import org.jetbrains.anko.*

class MainActivityUI : AnkoComponent<MainActivity> {
    override fun createView(ui: AnkoContext<MainActivity>) = with(ui) {
        relativeLayout {
            imageView(R.drawable.kotlin_android) {
                scaleType = ImageView.ScaleType.CENTER_CROP
            }.lparams(width = matchParent, height = matchParent)
            textView(R.string.narbase_loves_kotlin) {
                textSize = 34f
            }.lparams(width = wrapContent, height = wrapContent) {
                centerHorizontally()
                alignParentBottom()
            }
        }
    }
}
Customization of any components it’s the work of lparms at the end as you can see in the code above, between its parentheses you can set the width and height and in the brackets after it, you can specify the layout alignment, margins and so on (layout related). In the brackets after the view name, you can set its text, text size, scale type and other attributes related to the view itself.
In MainActivity.kt, the code is as follows:
package com.narbase.ankolayout

import android.support.v7.app.AppCompatActivity
import android.os.Bundle
import org.jetbrains.anko.setContentView

class MainActivity : AppCompatActivity() {

    override fun onCreate(savedInstanceState: Bundle?) {
        super.onCreate(savedInstanceState)

        MainActivityUI().setContentView(this)

    }
}
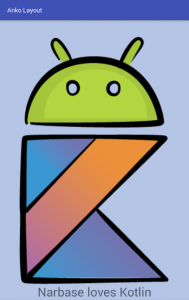
The output for the application
You can find the project on my GitHub page.
That’s is for this week, I hope you benefit from this tutorial and if you have any feedback, comments or any questions just let us know in the comment section.
The credit for the photo that had been used in this tutorial from raywenderlich.com. You can also check this tutorial if you want another example on Anko Layout.
Till next week.